Ever wondered how cloud providers run thousands of isolated servers on shared hardware, or how developers test software across multiple operating systems without owning dozens of physical machines? Virtualization technology makes this possible by running complete operating systems as files on your computer, transforming expensive hardware requirements into flexible software solutions. This comprehensive guide walks you through virtual machine fundamentals, hypervisor architectures, security best practices, and cloud computing models—equipping you to troubleshoot 80% of virtualization issues by mastering core concepts.
Reading Time: 15 minutes
What You’ll Learn:
- Virtual machine purpose and architecture fundamentals
- Type 1 vs Type 2 hypervisors: performance, security, and use cases
- CPU and RAM resource requirements for hosting VMs
- Virtual machine security: network shares, device management, and hardening
- Containers vs VMs: architectural differences and resource usage
- Cloud computing models: SaaS, IaaS, PaaS, and deployment types
- Hands-on configuration with Hyper-V, VMware, and VirtualBox
What Are Virtual Machines and Why Use Them?
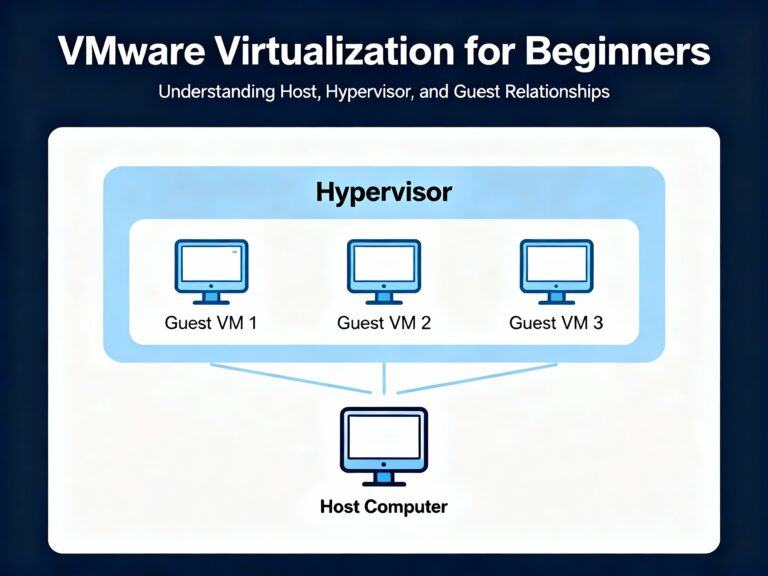
Virtual machines (VMs) enable running multiple guest operating systems simultaneously on a single physical computer, with each VM stored as a file on the host system. The host computer runs virtual machine manager software (hypervisor) that allocates CPU, memory, storage, and network resources to each guest, creating isolated environments perfect for testing, development, and production workloads.
Before virtualization, organizations needed separate physical servers for different operating systems and applications—Windows Server for Active Directory, Linux for web servers, additional Windows installations for testing. Virtualization eliminates this expense by consolidating workloads onto fewer physical machines, reducing hardware costs, power consumption, and data center space requirements.
Common Use Cases:
- Software testing: Test applications across Windows, Linux, and macOS without multiple computers
- Development environments: Create isolated development platforms without affecting production systems
- Server consolidation: Run multiple server roles (DNS, DHCP, file servers) on single hardware
- Legacy application support: Maintain older Windows XP or Windows 7 environments for legacy software
- Training and education: Learn new operating systems safely in sandboxed environments
Type 1 vs Type 2 Hypervisors
Type 1: Bare Metal Hypervisors
Type 1 hypervisors run directly on physical hardware without an underlying operating system, providing native performance and maximum efficiency. The hypervisor controls hardware resources directly, allocating CPU cores, memory, and I/O to guest VMs without negotiating through an OS layer.
Performance Advantages:
Type 1 hypervisors deliver superior VM performance because they bypass OS overhead, accessing hardware resources with minimal latency. Direct hardware interaction facilitates optimal resource allocation, making Type 1 ideal for production environments demanding 99.99% uptime and consistent performance.
Common Examples:
- VMware vSphere/ESXi: Industry standard for enterprise data centers and cloud infrastructure
- Microsoft Hyper-V for Windows Server: Integrated with Windows Server 2008 and higher for bare-metal deployments
- KVM (Kernel-based Virtual Machine): Open-source Linux hypervisor with strong Red Hat/RHEL integration
- Citrix Hypervisor (formerly XenServer): Enterprise virtualization for VDI and server workloads
Resource Requirements:
Enterprise Type 1 hypervisors demand powerful hardware—Intel Xeon or AMD EPYC processors with 384 GB to 1+ TB of RAM for production deployments supporting dozens of simultaneous VMs. Storage requirements scale with VM count, typically requiring SAN or NAS storage arrays with redundancy for enterprise availability.
Type 2: Hosted Hypervisors
Type 2 hypervisors run as applications within a host operating system (Windows, macOS, Linux), making them easier to install but introducing OS overhead that reduces performance. The hypervisor must request resources from the host OS rather than controlling hardware directly, creating additional latency for guest VMs.
When to Use Type 2:
- Testing and development: Cheaper (often free) and simpler to configure than Type 1
- Learning environments: Students and professionals exploring new operating systems
- Light workloads: Single-user scenarios not requiring maximum performance
- Desktop virtualization: Running Linux on Windows workstations or vice versa
Common Examples:
- Oracle VirtualBox: Free, cross-platform with broad OS support
- VMware Workstation Pro: Paid solution with advanced features like snapshots and VM cloning
- Microsoft Hyper-V for Windows 8/10/11: Included with Pro/Enterprise editions as optional Windows feature
- Parallels Desktop: macOS-focused for running Windows on Apple hardware
Performance Comparison
| Feature | Type 1 (Bare Metal) | Type 2 (Hosted) |
|---|---|---|
| Runs On | Physical hardware directly | Host operating system |
| Performance | Superior—no OS overhead | Lower due to host OS layer |
| Latency | Minimal—direct hardware access | Higher—must negotiate with OS |
| Security | Stronger (smaller attack surface) | Weaker (depends on host OS security) |
| Setup Complexity | Higher—requires dedicated hardware | Simple—installs like regular software |
| Cost | Expensive (enterprise licensing) | Free to moderate |
| Scalability | Hundreds of VMs per host | Limited by host OS resources |
| Best For | Production, data centers, cloud | Development, testing, training |
CPU and RAM Requirements
Virtualization Extensions
Modern CPUs require specific instruction set extensions to support hardware-assisted virtualization, dramatically improving VM performance by allowing guests to execute privileged instructions directly rather than through software emulation.
Intel Extensions:
- VT-x (Virtualization Technology): Core CPU extension enabling hardware virtualization. Must be enabled in BIOS/UEFI under “Virtualization Technology,” “Intel VT,” or “Vanderpool” depending on motherboard manufacturer
- VT-d (Directed I/O): Input/output memory management for PCI device passthrough to VMs
- VT-c (Connectivity): Network virtualization and I/O acceleration
AMD Extensions:
- AMD-V: CPU-level virtualization support, typically enabled by default and cannot be disabled in BIOS
- AMD-VI (I/O Virtualization): Equivalent to Intel VT-d for device passthrough
⚠️ Warning: Virtualization extensions are often disabled by default on consumer laptops and desktops, especially from certain OEMs. Check BIOS/UEFI settings under “Advanced,” “CPU Configuration,” or “Chipset” menus before attempting VM installations.
Enabling Virtualization in UEFI:
- Restart computer and enter BIOS/UEFI setup (typically Del, F2, or F10 during boot)
- Navigate to Advanced Mode → Advanced → CPU Configuration
- Enable “Intel Virtualization Technology” or “AMD-V”
- Enable “Intel VT-d” or “AMD-VI” if available for PCI passthrough
- Save changes and exit—system will reboot
Memory Requirements Per VM
Each running VM consumes the full amount of RAM allocated to it, regardless of whether the guest OS actively uses all assigned memory. If you allocate 8 GB to a Windows 10 VM, the host must reserve that 8 GB from physical RAM, making it unavailable to other VMs or the host OS.
Recommended RAM Allocations:
- Windows 10/11: 4-8 GB minimum, 8-16 GB for professional workloads
- Windows Server: 4-8 GB for domain controllers, 8-32 GB for SQL/Exchange servers
- Linux Desktop (Ubuntu/Fedora): 2-4 GB adequate for desktop usage
- Linux Server: 2-4 GB for web servers, scale based on workload
Resource Calculation Example:
Host system with 32 GB RAM running multiple VMs:
- Host OS (Windows 10): ~4-6 GB baseline usage
- VM 1 (Windows 10): 8 GB allocated
- VM 2 (Windows Server 2019): 8 GB allocated
- VM 3 (Ubuntu Linux): 4 GB allocated
- Total: 24-26 GB committed, leaving 6-8 GB headroom
💡 Tip: Start with conservative memory allocations (2-4 GB) and increase only if performance monitoring reveals memory pressure. Over-allocating memory wastes resources and limits the number of concurrent VMs.
CPU Core Allocation
Virtual machine managers allow assigning specific CPU cores to each VM, but allocating too many cores to VMs can starve the host OS and degrade overall system performance. Modern hypervisors use CPU scheduling to time-slice physical cores among VMs, so assigning 4 virtual CPUs doesn’t reserve 4 physical cores exclusively.
Best Practices:
- General rule: Allocate 1-2 cores per VM for basic workloads
- Server workloads: 4-6 cores for database or application servers requiring parallel processing
- Host CPU headroom: Reserve 1-2 cores exclusively for the host OS to maintain responsiveness
- Overcommit ratio: Safe to allocate 2-3x virtual CPUs compared to physical cores due to scheduling
Performance Monitoring:
Watch CPU and memory usage in Task Manager (Windows) or top/htop (Linux) while VMs run:
- CPU sustained above 80%: Reduce VM core allocations or upgrade host hardware
- Memory at 90%+ with heavy swapping: Add physical RAM or reduce VM memory allocations
- Disk I/O bottlenecks: Move VM storage to faster SSD or NVMe drives
Network Requirements
Virtual Network Adapters
Virtual machine managers create virtual network switches that VMs connect to, with three primary networking modes determining how VMs communicate with the physical network and each other.
NAT (Network Address Translation):
VMs receive private IP addresses on an internal network created by the hypervisor (e.g., 192.168.4.0/24), with the hypervisor performing NAT to route outbound traffic through the host’s physical network adapter. This provides internet access while isolating VMs from direct external connectivity—ideal for security-conscious environments.
Bridged Networking:
VMs obtain IP addresses directly from the physical network’s DHCP server, appearing as separate devices on the LAN with full bidirectional connectivity. This creates security vulnerabilities since VMs have unrestricted network access identical to physical machines.
Host-Only:
VMs communicate with each other and the host system but cannot access external networks—perfect for isolated lab environments testing malware or vulnerable software.
Bandwidth Planning
Allocate a minimum 20 Mbps per virtual machine for basic connectivity, increasing substantially for multimedia streaming, video conferencing, or large file transfers. Multiple VMs sharing a 1 Gbps network adapter must divide available bandwidth, so calculate aggregate requirements carefully.
Bandwidth Calculation Example:
10 GB file transfer on 1 Gbps network takes approximately 2 minutes with dedicated bandwidth. With 5 VMs sharing the connection, effective per-VM bandwidth drops to ~200 Mbps, increasing transfer time to 6-7 minutes assuming equal distribution.
⚠️ Warning: Not all physical network adapters support virtualization properly—verify compatibility with your chosen hypervisor before deployment. Some consumer NICs lack driver support for advanced features like SR-IOV (Single Root I/O Virtualization) required for high-performance VM networking.
Virtual Machine Security
Operating System Hardening
Virtual machines require identical security measures as physical computers—unpatched VMs present the same vulnerabilities and attack vectors as unpatched physical systems. Each guest OS should maintain current patches, service packs, antivirus definitions, and firewall configurations.
Security Baseline:
- Windows Updates: Enable automatic updates or maintain consistent patch schedules
- Linux Package Management: Regularly run
apt update && apt upgrade(Debian/Ubuntu) oryum update(RHEL/CentOS) - Antivirus Software: Install endpoint protection with real-time scanning enabled
- Firewall Configuration: Enable Windows Firewall or iptables/firewalld with restrictive rules
- Strong Authentication: Enforce complex passwords and disable default accounts
Hypervisor and VM File Security
Update Virtualization Software:
Hypervisor vulnerabilities can compromise all guest VMs simultaneously—promptly apply vendor security patches for VMware, Hyper-V, VirtualBox, or other platforms. Security updates often address VM escape vulnerabilities where attackers break out of guest isolation to attack the host.
Protect VM Disk Files:
Virtual machines exist as files (VMDK for VMware, VHDX for Hyper-V, VDI for VirtualBox) on the host filesystem. Compromising these files destroys entire VMs, so implement strict access controls:
- NTFS Permissions (Windows): Restrict VM folder access to Administrators and SYSTEM accounts only
- Linux Permissions: Set
chmod 700on VM directories, owned by hypervisor service account - Auditing: Enable filesystem auditing to track who accesses, modifies, or deletes VM files
- Backup Strategy: Schedule regular snapshots or backups to separate storage—test restoration procedures
- Encryption: Use BitLocker (Windows) or LUKS (Linux) to encrypt VM files at rest
- Digital Signatures: Some hypervisors support digitally signing VM files to detect tampering
Network Share Risks
⚠️ Critical Security Warning: Malware and attacks cannot traverse between VMs by default, but mapped network shares create direct pathways for malicious code propagation. A compromised VM with shared folders can infect the host system or other VMs through these connections.
Safe Network Share Practices:
- Map on-demand: Connect shares only when needed, disconnect immediately after use
- Disable auto-reconnect: Uncheck “Reconnect at logon” when mapping Windows drives
- Document share locations: Maintain inventory of which VMs have shared folders enabled
- Remove when finished: Delete shares permanently rather than leaving them dormant
- Monitor share access: Enable logging for file access on shared folders
Device Management and Resource Limitation
Disable Unnecessary Hardware:
Remove optical drives, USB ports, serial ports, and other removable media devices unless actively required. Enable devices only during use, then immediately disable—this applies both within guest OS Device Manager and hypervisor VM settings.
Throttle VM Resources:
A compromised VM can launch denial-of-service attacks by consuming excessive CPU, memory, or network bandwidth. Configure resource limits in hypervisor settings:
- CPU caps: Limit maximum CPU percentage any single VM can consume
- Memory limits: Set maximum RAM allocation to prevent memory exhaustion
- Network throttling: Cap bandwidth per VM to prevent saturation attacks
- Disk I/O limits: Restrict IOPS to prevent storage bottlenecks
Boot Priority and Monitoring
Set virtual BIOS/UEFI boot order to hard drive first, preventing boot-sector attacks from removable media. This mirrors physical computer security best practices.
Monitor VM resource usage periodically through hypervisor management consoles, but enable monitoring only for authorized administrators and disable when not actively troubleshooting. Excessive monitoring generates logs that consume storage and may contain sensitive information.
Hands-On: Hypervisor Configuration
VMware Workstation Setup
VMware Workstation Pro offers robust features for professional testing and development environments, supporting advanced snapshots, VM cloning, and remote management. The software installs as a Type 2 hypervisor within Windows or Linux host operating systems.
Creating a New VM:
- Launch wizard: File → New Virtual Machine → Custom (for advanced options)
- Hardware compatibility: Select target platform (Workstation 14/15, ESXi compatibility)
- Installation media: Choose ISO file location or install OS later
- Storage location: Browse to fast SSD/NVMe drive, create dedicated VM folder
- Firmware type: Select UEFI with Secure Boot for Windows 10/11 and modern Linux
- Processor allocation: Start with 1-2 cores, increase if performance monitoring reveals bottlenecks
- Memory: Allocate 4-8 GB for Windows, 2-4 GB for Linux
- Network: Choose NAT for security, Bridged for direct LAN access
- Disk type: SCSI (recommended), create 40-60 GB virtual disk
Virtual Network Editor:
Access Edit → Virtual Network Editor to configure VMware virtual switches:
- VMnet0 (Bridged): Direct connection to physical LAN
- VMnet1 (Host-Only): Isolated network for VM-to-VM and VM-to-host communication
- VMnet8 (NAT): Default 192.168.4.0/24 network with NAT to physical adapter
Create additional virtual networks for complex lab scenarios requiring network segmentation.
Hyper-V Configuration
Enabling Hyper-V on Windows 10/11:
Hyper-V ships disabled by default on Windows Pro and Enterprise editions:
- Open Windows Features: Control Panel → Programs and Features → Turn Windows features on or off
- Enable Hyper-V: Check “Hyper-V” box including both Management Tools and Platform
- Restart system: Windows installs components and reboots automatically
- Launch Manager: Search for “Hyper-V Manager” or access via Administrative Tools
Creating Virtual Switches:
Hyper-V requires manual virtual switch creation before VMs can access networks:
- Open Virtual Switch Manager: Right-click Hyper-V Manager → Virtual Switch Manager
- Create switch: Select “External” for physical network access
- Bind adapter: Choose which physical NIC the switch connects to
- Additional switches: Create “Internal” (VM-to-host) or “Private” (VM-to-VM only) as needed
New Virtual Machine Wizard:
- Specify name and location: Choose fast storage location outside C:\Users\Documents
- Select generation: Generation 2 supports Secure Boot and UEFI (recommended for Windows 10+)
- Assign memory: 2048 MB minimum, enable Dynamic Memory for automatic scaling
- Configure networking: Select previously created virtual switch
- Create virtual disk: Accept default VHDX format, 60 GB size
- Installation options: Mount ISO file or install later
💡 Tip: Generation 1 VMs support older operating systems (Windows XP, older Linux) but lack modern features. Generation 2 provides better performance but requires UEFI-capable guest OSs.
VirtualBox Basic Configuration
Oracle VirtualBox provides free, cross-platform virtualization suitable for learning and light testing:
- Download VirtualBox: Get latest version from virtualbox.org
- Create VM: Click “New,” name VM, select OS type and version
- Memory allocation: 2048 MB for Linux, 4096+ MB for Windows 10
- Virtual disk: Create VDI format, dynamically allocated, 20-60 GB
- Settings adjustment: Configure processors (System tab), enable EFI, adjust network mode
- Install guest additions: Enhances performance with better drivers and clipboard sharing
Virtual Machines vs Containers
Architectural Differences
Virtual machines virtualize entire computer systems including full operating systems, consuming substantial resources for each instance. Containers virtualize only the application layer, sharing the host OS kernel while isolating application processes and dependencies.
Resource Consumption:
VMs require gigabytes of disk space and RAM per instance because each runs a complete OS—Windows 10 VM consumes 20+ GB disk space and 4-8 GB RAM. Containers measure in megabytes since they package only application binaries and libraries, sharing the host kernel for system calls.
Boot Performance:
VMs take 30-60 seconds to boot as the entire guest OS initializes. Containers launch in 1-3 seconds because they’re isolated processes rather than full OS instances.
Use Case Comparison
| Feature | Virtual Machines | Containers |
|---|---|---|
| Boot Time | 30-60 seconds (full OS boot) | 1-3 seconds (process isolation) |
| Disk Usage | 10-40 GB per VM | 50-500 MB per container |
| Memory | 2-16 GB per VM | 100-500 MB per container |
| Isolation | Complete—separate kernel per VM | Process-level—shared kernel |
| Security | Stronger isolation, separate OS | Weaker—compromise affects host kernel |
| Portability | Less portable (hypervisor-specific) | Highly portable (Docker/Kubernetes) |
| Use Cases | Multiple services, different OSs, servers | Single application, microservices |
| Examples | Ubuntu VM, Windows Server VM | Web server container, database container |
When to Choose VMs:
- Running multiple services simultaneously (web server + database + monitoring)
- Different operating systems required (Windows Server + Linux)
- Maximum isolation for security-critical workloads
- Legacy applications requiring specific OS versions
When to Choose Containers:
- Single application or microservice deployment
- Rapid scaling for web applications
- Development/testing with consistent environments
- CI/CD pipelines requiring fast provisioning
Container Technologies:
- Docker: Dominant container runtime for application containerization
- Kubernetes: Container orchestration for managing thousands of containers
- Containerd: Low-level container runtime used by Docker and Kubernetes
- Podman: Daemonless Docker alternative popular in RHEL environments
💡 Tip: Many production environments run containers inside VMs for layered security—VMs provide strong isolation boundaries while containers enable efficient application density.
Cloud Computing Models
Software as a Service (SaaS)
SaaS delivers applications over the internet through web browsers, eliminating local installation and maintenance requirements. Users access fully functional software hosted by third-party providers, paying subscription fees rather than upfront licensing costs.
Common Examples:
- Gmail and Outlook.com: Web-based email accessible from any device
- Microsoft 365: Word, Excel, PowerPoint running in browsers
- Salesforce: CRM platform entirely cloud-hosted
- Slack and Zoom: Collaboration and video conferencing tools
- Dropbox and Google Drive: Cloud storage and file sharing
SaaS represents the most widely recognized cloud model, used daily by consumers and enterprises alike.
Infrastructure as a Service (IaaS)
IaaS provides virtualized computing resources over the internet, allowing organizations to rent servers, storage, networking, and load balancers without purchasing physical hardware. Companies provision virtual machines on-demand, scaling resources up or down based on workload requirements.
Benefits:
- Capital expense reduction: Eliminate server purchases, data center construction, and hardware refresh cycles
- Rapid provisioning: Deploy new virtual servers in minutes versus weeks for physical procurement
- Elastic scaling: Automatically add capacity during traffic spikes, remove during quiet periods
- Geographic distribution: Deploy VMs in multiple regions for low-latency global access
IaaS Providers:
- Amazon Web Services (AWS) EC2: Industry leader with extensive global infrastructure
- Microsoft Azure Virtual Machines: Integrated with Microsoft enterprise tools
- Google Compute Engine: Strong in data analytics and machine learning workloads
- IBM Cloud and Oracle Cloud: Enterprise-focused with hybrid cloud capabilities
Platform as a Service (PaaS)
PaaS provides complete development and deployment environments in the cloud, offering operating systems, programming languages, databases, and development tools without managing underlying infrastructure. Developers write code and deploy applications while the provider handles server provisioning, OS patching, and runtime management.
Development Workflow:
Programmers connect remotely to cloud-based development servers, writing and testing code without local servers consuming desk space or workstation resources. All CPU and memory-intensive compilation happens in the cloud, freeing local machines for lighter tasks.
PaaS often includes IaaS: Development platforms run on virtual infrastructure, effectively combining both models. The resulting architecture creates full cloud-based networks with virtual switches connecting virtual servers, all accessed through thin clients or web browsers.
PaaS Examples:
- Heroku: Simplified application deployment for Ruby, Python, Node.js, Java
- Google App Engine: Scalable application platform with automatic load balancing
- Microsoft Azure App Service: Integrated with .NET, Visual Studio development tools
- AWS Elastic Beanstalk: Automated infrastructure provisioning and management
Cloud Deployment Types
Public Cloud
Public clouds serve general consumers and businesses through shared infrastructure accessible to anyone with internet connectivity. Providers operate massive data centers with thousands of servers, offering services on pay-as-you-go or subscription pricing models.
Characteristics:
- Shared infrastructure: Multiple customers run workloads on the same physical hardware
- Internet-accessible: Services available from anywhere with network connectivity
- Low cost: Often free tiers available, paid services competitively priced
- Limited control: Provider manages security, compliance, and infrastructure decisions
Examples: Gmail, iCloud, Google Drive, Microsoft OneDrive, Amazon Cloud Drive
Private Cloud
Private clouds dedicate infrastructure exclusively to single organizations, providing enhanced control over security, compliance, and data sovereignty. No external entities access the environment, allowing customized configurations meeting strict regulatory requirements.
Advantages:
- Security and compliance: Meet HIPAA, PCI-DSS, FedRAMP, and industry-specific regulations
- Performance control: Guaranteed resource availability without “noisy neighbor” interference
- Customization: Deploy specialized hardware, operating systems, or network architectures
- Data sovereignty: Ensure data remains in specific geographic locations
Trade-offs: Private clouds cost significantly more than public alternatives due to dedicated infrastructure and management overhead.
Hybrid Cloud
Hybrid models combine public and private clouds, storing sensitive data in private environments while using public clouds for non-confidential workloads. Organizations balance security requirements with cost optimization by placing appropriate workloads in suitable environments.
Common Strategy:
- Public cloud: Development/testing environments, public-facing websites, archival storage
- Private cloud: Customer databases, financial records, intellectual property, regulated data
Community Cloud
Community clouds share private infrastructure among multiple related organizations with common requirements—industry consortiums, government agencies, or research institutions. Participants share costs while maintaining privacy from the general public.
Benefits: Lower costs than individual private clouds through resource pooling, while maintaining security controls inappropriate for public clouds.
Cloud Service Considerations
On-Demand and Measured Services
Cloud computing delivers resources in real-time as needed, with providers allocating specific CPU, RAM, bandwidth, and storage matching customer requirements. Users receive precisely what they pay for—no more, no less—ensuring cost efficiency for customers and optimal resource utilization for providers.
Measured services monitor consumption continuously, generating detailed billing reports showing exactly which resources were consumed and when. Customers analyze this data for cost optimization, identifying underutilized resources or unexpected usage spikes.
Metered Pricing: Organizations access virtually unlimited resources but pay only for actual consumption, similar to utility billing for electricity or water. This pay-per-use model eliminates over-provisioning costs while maintaining capacity for growth.
Rapid Elasticity and Scalability
Cloud resources must scale seamlessly as organizations grow—individual users may need more RAM or storage, while entire companies require additional servers and bandwidth. Providers demonstrating rapid elasticity allow customers to provision new resources in minutes through self-service portals or APIs.
Automatic Scaling: Modern cloud platforms detect increased load (web traffic spikes, processing jobs) and automatically provision additional capacity, then release resources when demand subsides. This elasticity ensures performance during peaks while minimizing costs during valleys.
Resource Pooling and Multi-Tenancy
Cloud providers achieve economies of scale through resource pooling—grouping powerful servers running dozens of virtual machines serving multiple customers simultaneously. A single high-end server with dual Xeon processors and 512 GB RAM might host 30-50 VMs for 20-30 different organizations.
This multi-tenancy model dramatically reduces per-customer costs compared to dedicated infrastructure. Customers share physical hardware but maintain logical isolation through hypervisor technology preventing cross-tenant access.
💡 Tip: Resource pooling happens transparently at multiple levels—internet bandwidth, storage arrays, compute nodes. Cable and fiber internet connections aggregate traffic from multiple subscribers before reaching backbone infrastructure, exemplifying resource pooling most consumers experience daily.
Key Takeaways
- Type 1 hypervisors run directly on hardware delivering superior performance for production workloads, while Type 2 hypervisors run within operating systems offering easier setup for development and testing
- Virtual machines require CPU extensions (Intel VT-x or AMD-V) enabled in BIOS/UEFI, with each VM consuming its full allocated RAM regardless of guest OS usage
- VM security mirrors physical computer requirements—maintain patches, antivirus, firewalls, and disable unnecessary devices, while protecting VM disk files with strict permissions and encryption
- Containers boot in 1-3 seconds using 100-500 MB RAM versus VMs requiring 30-60 seconds and 2-16 GB, but VMs provide stronger isolation through separate OS kernels
- Cloud computing delivers SaaS (applications), IaaS (infrastructure), and PaaS (development platforms) through public, private, hybrid, or community deployment models with on-demand scalability and metered billing
Frequently Asked Questions
Q: Should I use Type 1 or Type 2 hypervisors for learning virtualization?
A: Start with Type 2 hypervisors (VirtualBox, VMware Workstation, Hyper-V for Windows) since they’re free or low-cost and install like regular applications. Type 1 requires dedicated server hardware and enterprise licensing, making it impractical for personal learning.
Q: Why won’t my computer run virtual machines even after installing virtualization software?
A: Check if virtualization extensions (Intel VT-x or AMD-V) are enabled in BIOS/UEFI. Many laptops ship with these disabled—restart, enter BIOS setup, navigate to CPU Configuration, and enable “Virtualization Technology”.
Q: How much RAM do I need to run multiple virtual machines?
A: Calculate host OS baseline (4-6 GB) plus allocated RAM for each VM—Windows 10 VM needs 4-8 GB, Linux 2-4 GB. A 32 GB host can comfortably run 3-4 Windows VMs or 6-8 Linux VMs with proper resource allocation.
Q: What’s the difference between VMware Workstation and VMware ESXi?
A: Workstation is Type 2 running inside Windows/Linux for development and testing, while ESXi is Type 1 bare-metal hypervisor for production servers. ESXi delivers better performance but requires dedicated hardware.
Q: When should I use containers instead of virtual machines?
A: Use containers for single applications requiring rapid deployment and scaling—microservices, web apps, CI/CD pipelines. Choose VMs when running multiple services simultaneously, different operating systems, or requiring maximum security isolation.
Q: Can I run Hyper-V and VMware Workstation simultaneously on Windows?
A: No—both use conflicting hypervisor technologies that prevent coexistence. Attempting to run VMware with Hyper-V enabled generates “Device Credential Guard” errors. Disable Hyper-V through Windows Features before launching VMware.
Q: What’s the difference between SaaS, IaaS, and PaaS?
A: SaaS provides complete applications (Gmail, Office 365), IaaS provides virtualized infrastructure (servers, storage, networking), and PaaS provides development platforms (programming tools, databases). Think of IaaS as renting a server, PaaS as renting a configured development environment, and SaaS as renting finished software.
Next Steps
Start by downloading Oracle VirtualBox (free) and installing Ubuntu Linux in a VM to practice basic virtualization concepts. Experiment with snapshots, networking modes (NAT vs Bridged), and resource allocation adjustments while monitoring host system performance.
Hands-on labs to build skills:
- Create Windows 10 and Linux VMs, configure networking between them
- Practice enabling virtualization extensions in BIOS/UEFI
- Set up NAT, bridged, and host-only networks in different scenarios
- Install VMware Workstation trial or enable Hyper-V on Windows Pro
- Compare resource usage between running VMs locally vs on a server
- Experiment with container basics using Docker Desktop
- Research cloud provider free tiers (AWS, Azure, Google Cloud)
Related topics to explore:
- Advanced networking: VLANs, port groups, distributed switches
- VM migration and high availability clustering
- Storage technologies: SAN, NAS, vSAN for virtualization
- Kubernetes container orchestration fundamentals
- Cloud certifications: AWS Solutions Architect, Azure Administrator
Ready to build your virtualization lab? Share your setup challenges in the comments or subscribe for weekly infrastructure insights covering servers, networking, and cloud technologies.