Reading Time: 18 minutes
Introduction
You don’t need to wipe your Windows or Mac computer to master Linux. Professional virtualization allows you to run multiple Linux operating systems simultaneously on your existing machine—the exact same approach enterprises use for testing configurations before production deployment.
This comprehensive guide transforms your personal computer into a professional Linux lab environment, mirroring the infrastructure you’ll manage in corporate data centers.
What You’ll Learn:
- Hardware requirements and virtualization prerequisites for running Linux VMs
- VMware Workstation vs VirtualBox: Which hypervisor matches your career path
- Step-by-step Linux installation (CentOS Stream & Ubuntu Server)
- Snapshot management: Your safety net for risk-free learning
- Professional VM configuration that translates directly to enterprise environments
Prerequisites: No prior Linux experience required. You’ll need a computer with 8GB+ RAM and basic familiarity with downloading and installing software.
Understanding Virtualization: Running Computers Within Computers
Before diving into installation, you need to understand virtualization—the foundation of modern cloud computing and enterprise IT infrastructure.
What is Virtualization?
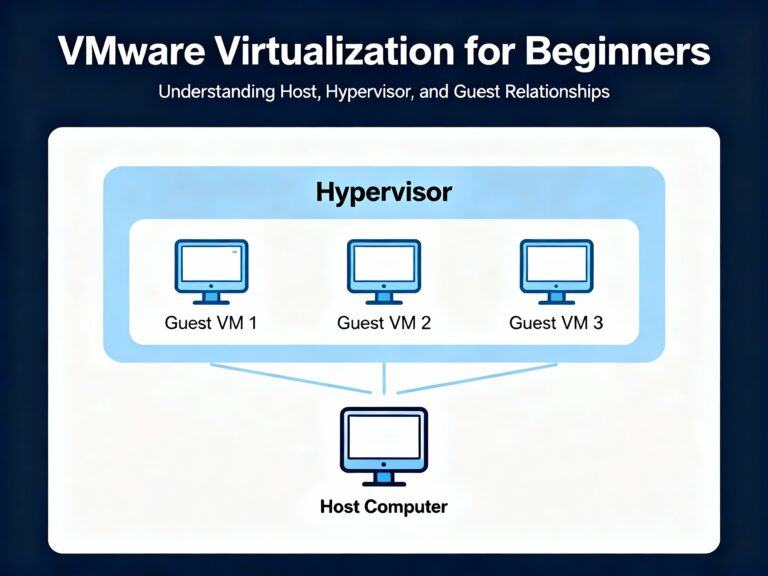
Virtualization software creates virtual machines (VMs)—software-based computers running inside your physical computer. Think of it as a computer within a computer: each VM has its own virtual CPU, RAM, hard disk, and network adapter, completely isolated from your host operating system .
Real-world analogy: Your physical computer is an apartment building. Each VM is a separate apartment with its own furniture (operating system), utilities (virtual hardware), and locked door (isolation). The building manager (hypervisor) allocates resources and ensures apartments don’t interfere with each other.
Why Virtualization Matters for Your Career
Enterprise reality: 80% of corporate virtualization infrastructure runs on VMware ESXi . AWS EC2 instances, Azure VMs, and Google Compute Engine all use virtualization. Learning VMware Workstation or VirtualBox today means you’re practicing the exact skills needed for managing cloud infrastructure tomorrow.
Cost savings: Instead of buying 5 physical servers for learning ($5,000+), you run 5 VMs on one laptop (free). This is why Fortune 500 companies consolidated from 1,000+ physical servers down to 50-100 servers running hundreds of VMs.
Lab Hardware Requirements: What You Actually Need
Don’t let “minimum requirements” fool you—here’s what actually works in practice based on real-world testing.
Minimum Configuration (Single Linux VM)
Processor: Dual-core CPU with virtualization support
- Intel: VT-x technology (most Core i3/i5/i7 processors since 2010)
- AMD: AMD-V technology (most Ryzen and FX processors)
RAM: 8GB total system memory
- Allocation: 2GB for Linux VM + 6GB for host OS
Storage: 80GB free disk space
- OS installation: 20GB
- Updates and packages: 20GB
- Snapshots: 30GB (critical for learning—more on this later)
- Buffer: 10GB
Host OS: Windows 10/11, macOS, or Linux
Reality check: This configuration runs one server VM comfortably. Opening Chrome with 10+ tabs while your VM runs may slow down your host.
Recommended Configuration (Professional Lab Setup)
Processor: Quad-core or better (Intel i5/i7/i9, AMD Ryzen 5/7/9)
- Enables running 3-4 VMs simultaneously
- VMware Workstation 25H2 now supports Intel Lunar Lake, Arrow Lake, and AMD latest architectures
RAM: 16GB+ total system memory
- Example allocation: 6GB server VM + 4GB client VM + 6GB host = 16GB
Storage: 120GB+ SSD (solid-state drive)
- Critical upgrade: SSDs reduce VM boot time from 60 seconds (HDD) to 10-15 seconds (SSD)
- NVMe SSDs provide even better performance for disk-intensive workloads
Host OS: Windows 11 Pro or Ubuntu 24.04 LTS
Why this matters: With 16GB RAM, you can run a web server VM, database VM, and client VM simultaneously—replicating realistic multi-tier application architecture.
Resource Allocation Formula
The 75% Rule: Never allocate more than 75% of host resources to VMs
Example calculation:
- Host: 16GB RAM
- Maximum VM allocation: 12GB total
- Safe distribution: 6GB server + 4GB client + 2GB buffer
- Host retains: 4GB (prevents system freezing)
Storage reality: A 60GB virtual disk doesn’t immediately consume 60GB. Fresh CentOS installation uses ~2-3GB, expanding dynamically as you install packages (thin provisioning) .
Checking Virtualization Support: Is Your CPU Ready?
Most modern processors support virtualization, but it’s often disabled by default in BIOS.
Windows Users: Task Manager Method
- Press
Ctrl+Shift+Escto open Task Manager - Click Performance tab
- Select CPU in left panel
- Look for Virtualization: Enabled in right panel
If it shows “Disabled”:
- Restart computer
- Press BIOS key during startup (usually F2, Del, F10, or F12—watch screen for prompt)
- Navigate to Advanced or Security section
- Find Intel VT-x or AMD-V or Virtualization Technology
- Change setting to Enabled
- Save and exit (usually F10)
Linux Users: Command Line Check
Open terminal and run:
egrep -c '(vmx|svm)' /proc/cpuinfo
Output interpretation :
0= Virtualization not supported or disabled in BIOS4or higher = Virtualization enabled (number indicates CPU cores)
Intel processors: Look for vmx flag
AMD processors: Look for svm flag
Mac Users: Default Enabled
Intel Macs: VT-x enabled by default—no action needed
M1/M2/M3 Macs: Use ARM-based virtualization. VMware Workstation not supported; use UTM (free) or Parallels Desktop (paid) instead
VMware Workstation vs VirtualBox: Career-Focused Decision
Both are Type-2 hypervisors (run on top of host OS), but they serve different career paths.
VMware Workstation 25H2 (Latest Release: October 2025)
Developer: Broadcom (acquired VMware in 2023)
Licensing:
- Free for personal/non-commercial use
- $199.99 for commercial environments
- Now follows calendar versioning (25H2 = 2025, 2nd half)
Platform support: Windows, Linux (no macOS support for Workstation Player)
Key advantages:
1. Superior performance: 10-15% faster CPU/disk I/O vs VirtualBox due to optimized drivers
2. Enterprise pathway: VMware ESXi powers 80% of corporate virtualization . Skills transfer directly to vSphere environments
3. USB 3.2 support: Built-in USB 3.0/3.2 device passthrough for external drives, security keys, hardware dongles
- Unity mode: Run Linux apps seamlessly within Windows desktop
- vSphere integration: Upload VMs directly to enterprise ESXi servers
- Hardware version 22: Latest virtual hardware with enhanced NVMe storage performance
5. 3D graphics acceleration: OpenGL/DirectX support for GUI-heavy distros (GNOME, KDE)
Best for:
- Corporate Linux career path (80% of enterprise jobs use VMware)
- Performance-sensitive workloads (databases, web servers)
- Integration with enterprise vSphere environments
Download: vmware.com/products/workstation-player (~600MB)
Oracle VirtualBox 7.0+ (Latest 2025 Release)
Developer: Oracle Corporation
Licensing: Completely free and open-source (GPL v2)
Platform support: Windows, macOS (including M1/M2/M3), Linux, Solaris
Key advantages:
1. True cross-platform: Same interface on Windows/Mac/Linux hosts—learn once, use everywhere
2. Zero cost: No licensing restrictions, commercial use allowed
3. Transparent development: Open-source code enables security auditing and community contributions
4. Extension Pack features: USB 2.0/3.0, remote desktop (RDP), disk encryption (requires separate 15MB download)
5. Excellent documentation: Massive community support and troubleshooting resources
Performance trade-off: 5-10% slower than VMware for disk-intensive workloads, but difference is negligible for learning environments
Best for:
- Mac users (especially M1/M2/M3 chips)
- Open-source enthusiasts
- Cost-sensitive individuals or startups
- Multi-platform consistency
Download: virtualbox.org/wiki/Downloads (110MB base + 15MB Extension Pack)
Head-to-Head Comparison (2025 Edition)
Recommendation:
- Corporate Linux career? Choose VMware Workstation (skills transfer to ESXi)
- Mac user or prefer open-source? Choose VirtualBox
- Budget-constrained startup? VirtualBox (zero licensing costs)
Downloading Required Software: Your Installation Checklist
Before creating VMs, gather these components.
Step 1: Virtualization Platform (Choose One)
Option A: VMware Workstation Player 25H2
- Visit vmware.com/products/workstation-player
- Click Download Now (Windows or Linux version)
- File size: ~600MB
- Installation time: 5 minutes
- No registration required for personal use
Option B: VirtualBox 7.0+ with Extension Pack
- Visit virtualbox.org/wiki/Downloads
- Download VirtualBox platform package for your OS (110MB)
- Download VirtualBox Extension Pack (15MB—same link, scroll down)
- Install base VirtualBox first, then Extension Pack
- Installation time: 5 minutes total
Step 2: Linux Distribution ISO Images
For Job Readiness: CentOS Stream 9 (Recommended)
- URL: mirror.centos.org/centos-stream/9-stream/BaseOS/x86_64/iso/
- File: CentOS-Stream-9-latest-x86_64-dvd1.iso
- Size: ~9GB
- Why: Binary-compatible with RHEL (70-80% of corporate Linux jobs require RHEL knowledge)
- Career advantage: Free training ground for $35,000 RHCSA certification skills
For Beginners: Ubuntu Server 24.04 LTS
- URL: ubuntu.com/download/server
- File: ubuntu-24.04.1-live-server-amd64.iso
- Size: ~2.5GB
- Why: User-friendly installer, extensive documentation, largest community support
- Benefit: Fastest path from zero to working Linux server (30-minute install)
For Desktop Experience: Ubuntu Desktop 24.04 LTS
- URL: ubuntu.com/download/desktop
- File: ubuntu-24.04.1-desktop-amd64.iso
- Size: ~5.7GB
- Why: GNOME GUI pre-installed for visual learners transitioning from Windows
- Use case: Practice GUI-based server administration before mastering CLI
Download tip: Use a download manager (Free Download Manager, JDownloader) for multi-GB ISOs—enables pause/resume if your connection drops .
Creating Your First Linux Virtual Machine
These instructions use VMware Workstation Player—VirtualBox steps are 95% identical (menu names slightly different).
Step 1: Launch VM Creation Wizard
- Open VMware Workstation Player
- Click Create a New Virtual Machine button
- Alternatively: File → New Virtual Machine
Step 2: Select Installation Method
Critical choice: Choose Installer disc image file (ISO)
- Select radio button: Installer disc image file (ISO)
- Click Browse
- Navigate to your Downloads folder
- Select your ISO file (e.g.,
CentOS-Stream-9-latest-x86_64-dvd1.iso) - Click Open
- Click Next
Why ISO method matters: VMware auto-detects the Linux distribution and configures optimal settings automatically (RAM, disk, network drivers) . Choosing “Install later” requires manual configuration and often results in networking issues.
❌ Common mistake: Selecting “I will install the operating system later” forces manual setup and disables Easy Install optimizations.
Step 3: Configure Guest Operating System
VMware should auto-detect the Linux type from your ISO .
Verify the detection:
- Guest operating system: Should show “Linux”
- Version: Should display “CentOS 9 64-bit” or “Ubuntu 64-bit”
If wrong:
- Manually select Linux from dropdown
- Choose correct distribution version from Version dropdown
Critical: Never select “Other Linux” or “Generic Linux”—this disables distribution-specific optimizations, VMware Tools integration, and optimized graphics drivers .
Click Next.
Step 4: Name Your Virtual Machine
Virtual machine name: Use descriptive naming
Good naming examples:
CentOS9-WebServer-Lab01Ubuntu24-Database-ServerRHEL9-Ansible-Controller
Bad naming examples:
LinuxVM1Test
Location: Choose folder with 60GB+ free space
Recommended structure:
- Windows:
C:\Virtual Machines\CentOS9-WebServer\ - Linux:
/home/username/VirtualMachines/CentOS9-WebServer/ - Mac:
/Users/username/VirtualMachines/CentOS9-WebServer/
❌ Avoid: Desktop or Documents folders (clutters filesystem and makes backup difficult)
Why naming matters: When you’re managing 10+ VMs for multi-tier application testing (web server, database, load balancer, monitoring), descriptive names prevent confusion and accidental deletion.
Click Next.
Step 5: Specify Virtual Disk Capacity
Maximum disk size: Configure based on use case
Allocation guidelines:
- Minimum: 20GB (OS only, no additional packages)
- Recommended: 60GB (OS + web server + database + 20GB free space)
- Advanced labs: 100GB (Kubernetes clusters, Docker images, multi-service deployments)
Storage option: Select Store virtual disk as a single file
Advantages:
- 10-15% better disk I/O performance vs split files
- Simpler backup (one file to copy)
Trade-off:
- Cannot move VM to FAT32 USB drives (4GB file size limit)
- Alternative: Select “Split into multiple files” (2GB chunks, portable but 10-15% slower)
Thin provisioning reality: Allocating 60GB doesn’t immediately consume 60GB on your host disk . Fresh CentOS install uses ~2-3GB, growing dynamically as you install packages (Apache, MySQL, Docker).
Storage breakdown example:
- Fresh install: 2.5GB
- After
yum update: 4GB - LAMP stack installed: 6GB
- 5 snapshots: +15GB
- Total after 1 month: ~21GB (out of 60GB allocated)
Click Next.
Step 6: Customize Hardware (CRITICAL CONFIGURATION STEP)
Before clicking Finish, click Customize Hardware button. This step determines VM performance and prevents frustrating bottlenecks.
Memory (RAM) Allocation
Calculation formula :
- Host has 8GB RAM → Allocate 2GB to VM (leave 6GB for host OS + web browser)
- Host has 16GB RAM → Allocate 4-6GB to VM (comfortable multitasking)
- Never exceed 75% of host RAM (causes host OS to swap to disk, freezing entire system)
VM type-specific recommendations:
- Headless server (no GUI): 2048 MB (2GB) minimum
- GUI distros (GNOME, KDE): 4096 MB (4GB) recommended
- Database server: 6144 MB (6GB) for optimal performance
- Development workstation: 8192 MB (8GB) if host has 16GB+
Set the value: Drag slider or type value in MB (e.g., 4096)
Processors
Configuration :
- Number of processors: 1
- Number of cores per processor: 2 (total 2 vCPUs)
Enable: ☑ Virtualize Intel VT-x/EPT or AMD-V/RVI (improves performance 20-30%)
Allocation guidelines:
- Dual-core host → Allocate 1 core max
- Quad-core host → Allocate 2 cores (leave 2 for host OS)
- Octa-core host → Allocate 4 cores for demanding workloads
❌ Common mistake: Allocating all host cores to VM leaves nothing for host OS, causing system unresponsiveness.
Network Adapter
Select: NAT (Network Address Translation) mode
Why NAT is recommended for learning:
- ✅ Provides internet access (
yum update,apt installwork immediately) - ✅ Isolates VM from host network threats
- ✅ No router configuration needed
- ✅ VM gets automatic IP addressing via DHCP
Alternative networking modes :
Bridged Adapter:
- VM appears as separate device on your local network
- Gets IP from your router’s DHCP
- Use for: Production testing, accessing VM from other computers on network
- Risk: VM exposed to same network threats as physical computers
Host-Only Adapter:
- VM communicates only with host computer (no internet)
- Use for: Security-sensitive labs, malware analysis, isolated testing
- Limitation: Cannot update packages or download from internet
For now, stick with NAT.
CD/DVD (IDE)
- ☑ Connected checkbox must be checked
- Verify: Use ISO image file points to your CentOS/Ubuntu ISO
- After OS installation: Uncheck “Connected” to free resources and prevent boot loops
Display Settings
For headless servers :
- ☐ Uncheck Accelerate 3D graphics (saves 256MB-512MB RAM)
For Ubuntu Desktop/GUI distros:
- ☑ Check Accelerate 3D graphics (enables smooth animations, window effects)
Sound Card
Remove it entirely for servers
- Right-click Sound Card → Remove
- Frees 50MB RAM and eliminates unnecessary device
Keep it for: Desktop Linux learning (Ubuntu Desktop with multimedia)
USB Controller
Keep it
- Needed for VMware Tools installation (guest additions)
- Required for USB device passthrough (external drives, security keys)
Final Hardware Summary
Typical server VM configuration:
- Memory: 4GB
- Processors: 2 cores
- Network: NAT
- Disk: 60GB (thin provisioned)
- Display: No 3D acceleration
- No sound card
Click Close → Finish
Your VM now appears in VMware library (powered off state). Time to install Linux!
Installing Linux Operating System (CentOS Stream 9 Walkthrough)
Step 7: Power On and Begin Installation
- Select your VM in VMware library
- Click Play virtual machine (green triangle)
- VM boots from ISO (simulates physical computer booting from DVD)
VMware prompt: “I copied it” vs “I moved it”
- Select I copied it
- Generates new MAC address (prevents network conflicts if sharing VM files)
CentOS Stream 9 Installation Process
Welcome Screen
- Boot menu appears with countdown timer
- Select Install CentOS Stream 9 (arrow keys + Enter)
- Don’t select “Test this media & install” (wastes 10 minutes)
Language Selection
- Choose English (United States) (or your preference)
- Click Continue
Installation Summary (Hub-and-Spoke Model)
This screen shows all configuration categories. Orange warnings indicate required configuration.
LOCALIZATION Section
Keyboard:
- Default: English (US)—leave unchanged
- If using non-US keyboard, click to add layout
Language Support:
- Default: English (United States)—leave unchanged
Time & Date:
- Click to configure
- Select your timezone (e.g., Asia/Kolkata for India, America/New_York for US East Coast)
- Toggle Network Time to ON (syncs clock via NTP automatically)
- Click Done
SOFTWARE Section
Installation Source:
- Auto-detected: Local media—leave default
- This points to your ISO image
Software Selection (CRITICAL CHOICE):
Click Software Selection to configure.
Base Environment options:
- Server (Recommended for learning)
- Headless (no GUI, command-line only)
- Uses only 512MB-1GB RAM
- Corporate reality: 95% of production servers run headless
- Prepares you for real-world Linux administration
- Server with GUI (For beginners transitioning from Windows)
- Includes GNOME Desktop Environment
- Uses 2GB+ RAM
- Helpful for visual learners
- Easy to disable GUI later:
sudo systemctl set-default multi-user.target
- Minimal Install
- Absolute bare minimum (no extras)
- Expert users only
Select: Server or Server with GUI based on your comfort level.
Add-ons for Selected Environment (left panel shows additional software groups):
☑ Check these essential add-ons:
- ☑ Development Tools (installs gcc, make, git—essential for compiling software)
- ☑ System Tools (adds useful utilities like htop, vim, wget)
- ☑ Security Tools (SELinux management tools, firewall utilities)
Click Done.
SYSTEM Section
Installation Destination (MOST CRITICAL STEP):
Click Installation Destination.
Device Selection:
- You’ll see VMware Virtual disk (60GB)
- Click to select it (checkmark appears)
Storage Configuration:
Option 1: Automatic (Recommended for beginners)
- Select Automatic radio button
- CentOS creates sensible partition scheme automatically:
/boot(1GB) – boot files/(55GB) – root filesystemswap(4GB) – virtual memory
Option 2: Custom (Advanced users)
- Manually create partitions:
/boot– 1GB (ext4)/– 30GB (xfs)/home– 20GB (xfs)/var– 8GB (xfs)swap– 4GB
For now, choose Automatic.
Click Done.
Network & Host Name:
Click Network & Host Name.
Ethernet adapter (usually named ens33 or ens160):
- Toggle switch to ON
- Status changes from “Disconnected” to “Connected”
- IP address appears below adapter name (e.g.,
192.168.116.128) - This enables DHCP (automatic IP assignment via NAT)
Host Name:
- Enter descriptive name:
centos9-lab01.localdomain - Click Apply
- Format:
hostname.domain(standard FQDN format)
Verify: You should now see IPv4 address, gateway, and DNS server below the adapter.
Click Done.
USER SETTINGS Section
Root Password (CRITICAL SECURITY STEP):
Click Root Password.
Set strong password :
- Learning labs:
RedHat123!(easy to remember) - Production environments: 16+ character randomized password
- Warning: Root is all-powerful admin account—compromised root = total system compromise
If weak password:
- CentOS shows orange warning
- Click Done twice to confirm (acknowledges security risk)
Security note: You’ll use root sparingly—most work happens via sudo with regular user account.
Click Done.
User Creation (HIGHLY RECOMMENDED):
Click User Creation.
Create administrative user :
- Full name:
Admin User - User name:
admin(or your preference) - ☑ Make this user administrator (grants sudo privileges)
- Password: Set different from root password
- ☐ Uncheck “Require password for this user” (convenience for labs, never in production)
Why create regular user:
- Root logins should be rare (logged and audited)
- Regular user +
sudoprovides accountability (who did what, when) - Protects against typos (
sudo rm -rf /etcasks for password confirmation)
Click Done.
Begin Installation
All required sections now show ✓ checkmarks.
Click Begin Installation (bottom-right blue button).
Installation progress:
- Installs 1,500+ packages (Server with GUI) or 400+ (Server)
- Time estimate: 15-30 minutes depending on host disk speed
- Progress bar shows: “Installing @base”, “Installing kernel”, “Setting up devices”
- You can watch logs: Click “Installation log” button at bottom for detailed output
While installing: Root password and user creation complete in background (already configured).
Installation Complete
Blue button changes to Reboot System.
Before clicking Reboot:
- In VMware window, click VM menu (top menu bar)
- Navigate to Removable Devices → CD/DVD (IDE) → Settings
- Uncheck Connected
- Click OK
Why disconnect ISO: Prevents boot loop (VM would boot from ISO again instead of installed system).
Click Reboot System.
VM restarts. GRUB boot loader appears briefly, then CentOS login prompt:
CentOS Stream 9
centos9-lab01 login: _
Success! Your Linux system is installed.
First Login and System Verification
Logging In
Login prompt: centos9-lab01 login:
- Type username:
admin(press Enter) - Type password (cursor won’t move—normal Linux security behavior)
- Press Enter
Success indicator: You see command prompt:
[admin@centos9-lab01 ~]$
This means:
admin= current usercentos9-lab01= hostname~= current directory (home directory)$= regular user prompt (#would indicate root)
Verify Internet Connectivity
Test network configuration:
ping -c 4 google.com
Expected output:
PING google.com (142.250.185.46) 56(84) bytes of data.
64 bytes from ord37s34-in-f14.1e100.net: icmp_seq=1 ttl=117 time=12.3 ms
64 bytes from ord37s34-in-f14.1e100.net: icmp_seq=2 ttl=117 time=11.8 ms
64 bytes from ord37s34-in-f14.1e100.net: icmp_seq=3 ttl=117 time=12.1 ms
64 bytes from ord37s34-in-f14.1e100.net: icmp_seq=4 ttl=117 time=11.9 ms

--- google.com ping statistics ---
4 packets transmitted, 4 received, 0% packet loss
What this confirms :
- ✅ Network adapter working
- ✅ DHCP assigned IP address
- ✅ NAT providing internet access
- ✅ DNS resolving domain names
- ✅ Firewall allowing outbound traffic
If ping fails: Check VMware network adapter is set to NAT and “Connected” checkbox is enabled.
Update System (CRITICAL SECURITY STEP)
First command after installation should always be system update :
CentOS/RHEL:
sudo yum update -y
Ubuntu:
sudo apt update && sudo apt upgrade -y
What happens:
- Downloads 500MB-2GB of security patches and bug fixes
- Updates kernel, systemd, firewall, OpenSSH, and 500+ packages
- Takes 10-20 minutes on first run (subsequent updates much faster)
- Never skip this step—outdated systems are vulnerable to known exploits patched months ago
Output shows:
Last metadata expiration check: 0:01:23 ago on Fri Dec 19 22:15:42 2025.
Dependencies resolved.
================================================================================
 Package                    Arch        Version              Repository    Size
================================================================================
Upgrading:
 kernel                     x86_64      5.14.0-503.el9       baseos        7.2 M
 systemd                    x86_64      252-46.el9           baseos        4.2 M
 ...
Transaction Summary
================================================================================
Upgrade  287 Packages

Total download size: 542 M
Is this ok [y/N]: y
Type y and press Enter (or use -y flag to auto-accept).
After updates complete:
sudo reboot
System restarts with latest security patches applied.
Snapshots: Your Time Machine for Learning
Snapshots are the single most important feature for learning Linux—they create instant restore points .
Why Snapshots Are Essential
Learning scenario: You’re practicing user management and accidentally run:
sudo rm -rf /etc/* # DANGEROUS: Deletes all system configuration
Without snapshot:
- System completely broken
- Reinstall OS (30 minutes lost)
- Redo all configuration
- Lost all progress
With snapshot:
- Revert to working state in 15 seconds
- No data loss
- Continue learning immediately
Professional Use Cases
Enterprise administrators snapshot before:
- Kernel updates (
yum update kernel)—occasionally breaks boot process - Editing
/etc/ssh/sshd_config—typo locks you out of SSH - Firewall rule changes (
firewall-cmd)—misconfiguration blocks network - Database migrations—rollback if corruption occurs
- Installing new packages—rollback if dependencies conflict
Your learning journey snapshots:
- After OS installation
- After
yum updatecompletes - After each course module
- Before risky experiments
- After successfully configuring each service (Apache, MySQL, Docker)
Creating VMware Snapshots (Step-by-Step)
Step 1: Decide When to Snapshot
VM state :
- Powered on: Snapshot includes RAM state (faster restore, but larger file size)
- Powered off: Snapshot only includes disk state (smaller file size, recommended for learning)
For learning: Power off VM before taking snapshots (saves disk space).
Step 2: Access Snapshot Menu
- Select your VM in VMware library
- Click VM menu (top menu bar)
- Navigate to Snapshot → Take Snapshot
Keyboard shortcut: Ctrl+Shift+S (Windows/Linux) or Cmd+Shift+S (Mac)
Step 3: Name Snapshot Descriptively
Bad naming:
- ❌
Snapshot 1 - ❌
Backup - ❌
Test
Good naming :
- ✅
01-Fresh-Install-Post-Updates - ✅
02-Apache-Installed-Working - ✅
03-Before-Firewall-Config - ✅
04-LAMP-Stack-Complete
Snapshot name: Fresh-Install-Post-Updates
Description: Include critical details
CentOS Stream 9 clean install
Date: 2025-12-19
All packages updated via yum update
Network configured with DHCP (192.168.116.128)
SSH enabled and tested
Root password: RedHat123!
Admin user: admin (sudo privileges)
Ready for Apache installation
Why detailed descriptions matter: In 3 months when you have 15+ snapshots across 5 VMs, you’ll forget which snapshot contains what. Detailed descriptions = zero guesswork.
Step 4: Take Snapshot
Click Take Snapshot button.
Progress:
- VMware freezes VM momentarily (2-5 seconds)
- Creates snapshot files in VM directory
- Progress bar appears briefly
- Completion notification
Snapshot file size :
- Powered-off VM: Size = disk changes since last snapshot
- Example: 5GB OS changes = 5GB snapshot file
- Powered-on VM: Size = current RAM usage + disk changes
- Example: 4GB RAM + 5GB disk changes = 9GB snapshot file
Disk space reality:
- Base VM: 60GB allocated (3GB actually used)
- 5 snapshots × 4GB average = 20GB
- Total disk usage: 23GB
Best Practice Snapshot Naming Scheme
Use numbered prefixes for chronological clarity :
01-Fresh-Install
02-Post-Updates
03-Development-Tools-Installed
04-Apache-Configured
05-MySQL-Installed
06-PHP-Configured
07-LAMP-Stack-Complete
08-Before-Firewall-Experiment
09-Firewall-Working
10-Module-1-Complete
Benefits:
- Numerical order shows progression
- Easy to identify “last known good” state
- Clear rollback targets
Restoring from Snapshots (Reverting)
Scenario: You Broke SSH Configuration
After editing /etc/ssh/sshd_config, SSH no longer starts. Error message:
sshd: /etc/ssh/sshd_config line 42: Bad configuration option: PermitRootLogin yes
You can’t remember original configuration. Time to revert.
Step 1: Power Off VM (Optional)
VM can be running or off—VMware handles both states .
For clean revert: Power off first (sudo shutdown -h now)
Step 2: Open Snapshot Manager
- Select VM in VMware library
- Click VM menu → Snapshot → Snapshot Manager
Snapshot Manager window opens, showing:
- List of all snapshots (left panel)
- Snapshot details (right panel): name, description, date, current state marker
Step 3: Select Target Snapshot
Current state: Indicated by “You Are Here” marker
Restoration targets: All previous snapshots listed chronologically
Select snapshot: Click on 03-Apache-Configured (state before you edited SSH config)
Right panel shows description: Verify this is the correct restore point
Step 4: Restore Snapshot
Click Go To button (or right-click snapshot → Revert to Snapshot)
Confirmation dialog appears:
The current state of the virtual machine will be discarded
and the virtual machine will revert to the state captured in
the snapshot '03-Apache-Configured'.
Critical warning: All changes made after this snapshot are permanently erased (unless you have subsequent snapshots)
Click Yes to confirm.
Restoration process:
- Takes 5-15 seconds (faster than full boot)
- VM instantly reverts to snapshot state
- Power on VM
- SSH configuration is back to working state
Result: Your broken SSH config is gone. System restored to working state before you made the mistake.
VirtualBox Snapshot Workflow (Key Differences)
Creating VirtualBox Snapshot
- Select VM in VirtualBox Manager
- Click Machine menu → Take Snapshot
- Keyboard shortcut:
Ctrl+Shift+T
Snapshot dialog:
- Snapshot Name: Enter descriptive name
- Snapshot Description: Add detailed notes
- Click OK
Snapshot created in 5-10 seconds.
Viewing Snapshots in VirtualBox
Click Snapshots button (right side of VirtualBox Manager, next to “Details” tab)
Tree-based view shows:
- Current state (top)
- All snapshots in hierarchical tree
- Advantage: VirtualBox supports branching (multiple timelines from same snapshot)
Restoring VirtualBox Snapshot
- Click Snapshots tab
- Right-click target snapshot → Restore Snapshot
- Safety option: ☑ “Create a snapshot of current machine state”
- Preserves current state before reverting
- Enables “undo the restore” if needed
- Click Restore
VM reverts to selected snapshot state.
VirtualBox Branching Feature
Unique capability: Create multiple timeline branches from same snapshot
Example scenario:
- Snapshot:
05-LAMP-Stack-Complete - Branch 1: Test Apache performance tuning → Create snapshots in this timeline
- Branch 2: Test Nginx as Apache alternative → Separate timeline
- Switch between branches without losing either
Use case: Compare different approaches to solving same problem without losing progress.
Snapshot Management Best Practices
How Many Snapshots to Keep
Beginners: 3-5 snapshots maximum
Reason: Each snapshot consumes disk space equal to changes made since previous snapshot
Example calculation:
- Base VM: 60GB allocated
- 5 snapshots × 4GB average changes = 20GB additional
- Total host disk usage: 80GB
Advanced users: 10-15 snapshots with aggressive deletion of outdated states
When to Delete Snapshots
Delete when :
- Snapshot older than 30 days (outdated configuration no longer relevant)
- Completed module and no longer need rollback capability
- Running low on host disk space
- Consolidating snapshots to reclaim space
Warning: Deleting snapshots is permanent—cannot be undone.
Deleting VMware Snapshots
Method 1: Delete specific snapshot
- VM menu → Snapshot → Snapshot Manager
- Select snapshot to delete
- Click Delete button (or right-click → Delete Snapshot)
- Confirm deletion
What happens:
- VMware merges snapshot changes into base disk
- Takes 2-30 minutes depending on snapshot size
- Reclaims disk space after merge completes
Method 2: Delete all snapshots
- VM menu → Snapshot → Delete All Snapshots
- Danger: Removes ALL snapshots, keeps only current state
- Use sparingly—only when 100% certain
Professional Workflow Pattern
Before risky change:
- Take snapshot:
08-Before-Firewall-Config - Make configuration change
- Test thoroughly
If change successful:
- Test for 24-48 hours in various scenarios
- If stable, take new snapshot:
09-Firewall-Working - Delete previous snapshot:
08-Before-Firewall-Config - Result: Current working state preserved, old state removed
If change failed:
- Revert to snapshot:
08-Before-Firewall-Config - Troubleshoot issue
- Repeat process with better approach
Snapshot Limitations (What They DON’T Protect Against)
Scenarios Snapshots Can’t Save You From
❌ Host computer hardware failure :
- VM files stored on host disk
- If host disk fails, VM and all snapshots are lost
- Solution: Regular backups to external drive
❌ Accidental VM deletion:
- Deleting VM in VMware library deletes all snapshots too
- Solution: Export VM to OVF before risky operations
❌ Ransomware on host OS:
- Malware encrypting host filesystem encrypts VM files including snapshots
- Solution: Offline backups, air-gapped external drives
❌ Host OS corruption:
- Windows blue screen, filesystem corruption affects VM files
- Solution: Separate backup strategy
Snapshots vs Backups: Critical Distinction
| Feature | Snapshot | Backup (OVF/OVA Export) |
|---|---|---|
| Purpose | Quick rollback within same VM | Disaster recovery, VM portability |
| Speed | Restore in 15 seconds | Restore in 10-30 minutes |
| Storage Location | Same folder as VM | External drive, cloud storage |
| Protection Against | Configuration mistakes, bad updates | Host failure, VM deletion, ransomware |
| Disk Space | 4-8GB per snapshot | 10-40GB per full backup |
| Frequency | Multiple times per day | Weekly or after major milestones |
Best practice: Use both strategies
- Snapshots: Frequent (before every risky change)
- Backups: Periodic (weekly, after completing modules)
Creating VM Backup (Export to OVF/OVA)
VMware export process :
- Power off VM
- File menu → Export to OVF
- Select destination (external USB drive recommended)
- Wait 10-30 minutes (exports entire VM)
- Result: Portable VM file you can import on any computer running VMware
VirtualBox export process :
- Power off VM
- File menu → Export Appliance
- Select VM from list
- Choose OVA format (single file, easier to manage)
- Select destination
- Click Export
- Wait 10-30 minutes
Backup schedule recommendation:
- After completing major milestone (LAMP stack working)
- Before major system changes (kernel update)
- Weekly during active learning period
- Monthly once system is stable
Storage location: External drive disconnected when not in use (protects against ransomware)
Career Connections: Lab Skills → Enterprise Reality
Real-World Enterprise Parallels
Your lab setup directly mirrors corporate infrastructure:
Transferable skills: When you join a company using VMware vSphere or Red Hat Virtualization, the web interface looks 80% similar to Workstation Player. You’ll immediately recognize:
- Create VM workflow
- Memory/CPU allocation sliders
- Network adapter configuration
- Snapshot management buttons
- Storage provisioning options
- AWS EC2 instance = Your Linux VM (same concept, cloud-hosted)
- EC2 snapshot = EBS volume snapshot (instant restore point)
- Security group = Firewall rules (just like your VM firewall configuration)
- VPC = Virtual Private Cloud (advanced NAT networking)
Immediate Next Steps After This Lab
Week 1: Linux CLI Fundamentals
- Navigation:
ls,cd,pwd,mkdir,rmdir - File operations:
cp,mv,rm,touch,cat - Text editors:
vim,nano - Viewing files:
less,more,head,tail
Week 2: User & Permission Management
- Create users:
useradd,passwd - Modify users:
usermod,userdel - Groups:
groupadd,usermod -aG - Permissions:
chmod,chown, understandingrwxrwxrwx - Sudo configuration:
/etc/sudoers,visudo
Month 1: System Administration
- Package management:
yum install,yum search,yum remove(CentOS) orapt(Ubuntu) - Services:
systemctl start/stop/restart/enable/status - Logs:
journalctl,/var/log/messages - Networking:
ip addr,ip route,ss -tunlp - Firewall:
firewall-cmd,iptables
Month 2: Web Server & Database
- Install Apache:
sudo yum install httpd - Configure virtual hosts:
/etc/httpd/conf.d/ - Install MySQL/MariaDB:
sudo yum install mariadb-server - Install PHP:
sudo yum install php php-mysqlnd - Build LAMP stack: Linux + Apache + MySQL + PHP
Month 3: Automation & Containers
- Bash scripting: Variables, loops, conditionals, functions
- Cron jobs: Scheduled tasks, log rotation
- Docker basics: Images, containers, Dockerfile
- SSH: Remote management, key-based auth, security hardening